I have done quite a lot..... And I still have to do a lot..... You may be thinking..... Why? Simple because I have a closet full of beads..... Those little buggers are so very addictive 🙃
But I thought to myself..... Why on earth should I go through this alone..... Why not rub it off on a few others here..... That's an evil plan, I know..... But I just can't help it..... I blame my mom and dad..... They are the ones that made me..... I had no say in it 😈
So if you are a bit like me..... Evil..... Come and join me in spreading this addiction..... And start by trying out this pattern to make this Magical Triangle 😋
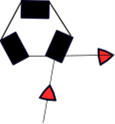
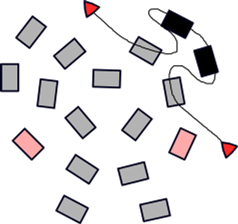
Here is an example of what we will be making


Picture by Seadbeady
Pattern Peyote Triangle
I always use Toho or Miyuki Delica beads because, in my opinion, they get the best results..... To make it easy it is best to work with 2 different colors of beads..... We will call them A and B
Step 1
On a comfortable length of thread pick up 3 beads A and go through them again to make a ring as shown on the drawing below
Picture by Seadbeady
Step 2
Pick up 2 beads A and go through the next A bead. I have made the beads from the previous drawing light grey and the newly added beads black.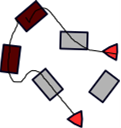
Picture by Seadbeady
Step 3
Pick up 2 beads A and go through the next A bead.
Picture by Seadbeady
Step 4
Pick up 2 beads A and go through the next A bead.
Picture by Seadbeady
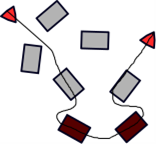
Step 5
Now we need to step up to the next round by going through the first A bead added in step 2.
Picture by Seadbeady
Step 6
Pick up 2 beads A and go through the next A bead.
Picture by Seadbeady
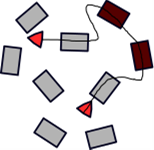
Step 7
Pick up one bead B and go through the next A bead. From here on the newly added B beads will be red and the ones from previous rounds will be pink.
Picture by Seadbeady
Step 8
Pick up 2 beads A and go through the next A bead.
Picture by Seadbeady
Step 9
Pick up one bead B and go through the next A bead.

Picture by Seadbeady
Step 10
Pick up 2 beads A and go through the next A bead.
Picture by Seadbeady
Step 11
Pick up one bead B and go through the next A bead.

Picture by Seadbeady
Step 12
Step up to the next round as you did in step 5
Step 13
Pick up 2 beads A and go through the next A bead.
Step 14
We will add 2 beads B instead of one now.
Picture by Seadbeady
Step 15
Repeat this for the rest of this round and step up to the next round as you did before
Step 16
In the next round we will add 3 beads B instead of 2 and so on
Step 17
You can make it as big as you want - to end it you make a round by just adding one bead A on the 3 corners.
There is a lot you can do with these..... You can make them into earrings or make several triangles and put them together to make a bracelet 😃
But was is most important is that you have fun making them..... Show me yours when you finished it..... Your triangle of course 😁
One more thing..... Don't come crying to me if you get addicted..... I did warn you 🤣🤣
Hope you like my blog post.....Until next time.....Have a great day
Renata (Seadbeady)
Want to be on my blog next time ?? Want me to review your product?? Just send me a message
Behind every unique handmade piece is a lot of hard work. It's a labor of love and every piece you buy will make someone's day a happy day. Follow me on Bloglovin