
I am way too creative for my own good.....There is not enough time for me to do all the things I love to do.
At the moment I am most into beading and since I haven't done so before.....I thought this might be a great time to share a beading pattern with you 😊
Pattern 2 drop peyote (18 cm or 7.09 inch)
It is best to use Toho or Miyuki beads size 11 to get the best resultsYou'll need a slide clasp that is approximately the same width, or slightly more narrow than your bracelet band.
- Pick up a bead and go through it again to make a knot. This will be your stop bead.
- Pick up another 11 beads so that you have 12 in total (stop bead included).
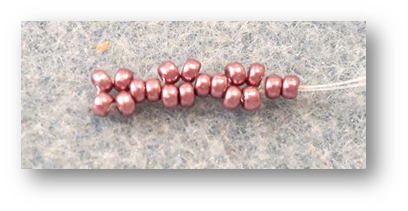
This will be your first row, and you now are starting your second row. - Pick up 2 beads and pass your needle through the 3rd and 4th bead of the first row.
- Pick up 2 beads and pass your needle through the 7th and 8th bead of the first row. Pick up 2 beads and pass your needle through the 11th and 12th bead of the first row (as shown on the image below).
- The second row is ready now and you are starting the 3rd row now.
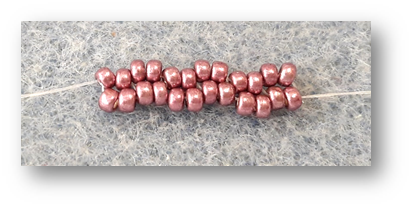
- Pick up 2 beads and pass your needle through the 3rd and 4th bead of the second row.
- Pick up 2 beads and pass your needle through the 7th and 8th bead of the second row.
- Pick up 2 beads and pass your needle through the 11th and 12th bead of the second row. (as shown in the image below).
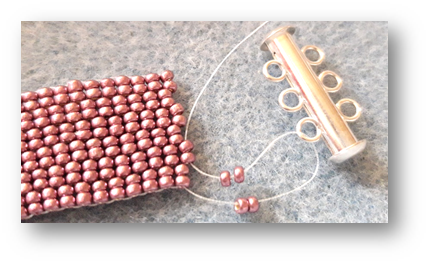
- Repeat this pattern until you have a length of 16.5 cm or 6.50 inch. Make sure to always pull tight your wire to get nice and even beadwork.
- Attach the slide clasp by picking up 2 beads and pass through the first metal ring on the clasp from front to back. Pick up another 2 beads and pass through the 3rd and 4th bead of your end row (as shown on the image below).
- Pick up 2 beads and go through the second metal ring on the clasp from front to back.
- Pick up another 2 beads and pass through the 7th and 8th bead of your end row.
- Pick up 2 beads and go through the third metal ring on the clasp from front to back.
- Pick up another 2 beads and pass through the 11th and 12th bead of your end row.
Make sure to pull your wire tight to make the closure fit tight. (as shown in the image below).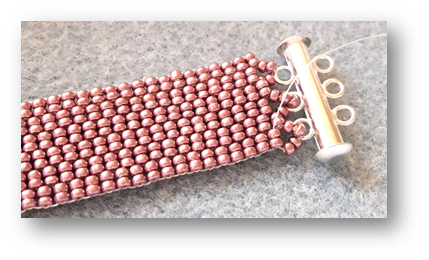
- Pass through these last beads and metal rings again in the opposite direction to make sure the thread is secure.
- Attach the clasp on the other end the same way you did on the first end of the bracelet.
And finished.....It's that simple 😋
Hope you like my blog post.....Until next time.....Have a great day
Renata (Seadbeady)
Behind every unique handmade piece is a lot of hard work. It's a labor of love, and every piece you buy will make someone's day a happy day.
Follow me on Instagram https://www.instagram.com/seadbeadyblogs
Follow me on Bloglovin to save posts, create collections, and follow other blogs all in one https://www.bloglovin.com/blogs/seadbeadys-fashion-lifestyle-blog-19062377
Join me in my Facebook group to get more involved or just keep in touch https://www.facebook.com/groups/426461765186641
Want to be on my blog next time?? Want me to review your product?? Just send me a message at seadbeady@telenet.be 😊


Gosh, you're really talented with this! How long did it take you to be an expert on it?
ReplyDeleteLove this! I've never tried beading before but like you, there is just not enough time in the day for me to do all the things! Will definitely share this with my daughter who is also very creative!
ReplyDeleteSo beautiful, and you make it easy to make! I love simplicity in jewelry.
ReplyDeleteSo lovely! Simple yet stunning. Love this creative outlet.
ReplyDeleteThis is such a beauty of a bracelet loving this tutorial
ReplyDeletetwo things. It seems it needs a lot of patience to do but the end product is very nice. Well, that is how the world works right? ;)
ReplyDeleteThis looks so cute! And it doesn't look that hard to make either :)
ReplyDeleteoh these are so cute! I would love to make this cute bracelet with my daughter, that is a fun project to look forward to.
ReplyDeleteThat is such a cute bracelet and it looks like it's easy to make as well. I have seen these during my trip to Tanzania, they were green, with the country's flag on them.
ReplyDeleteThis reminds me of crafts product I did when I was in elementary school. I would love to do this type of project again as I love making my own things!
ReplyDeleteI'm creative but I can't make that. I just have no talent when it comes to beadworks.
ReplyDeleteInteresting and informative post. Maybe I`ll make my own bracelet one day. I bet it is very calming process.
ReplyDeleteVery cool! Looks like it's a creative endeavour and they end up beautiful!
ReplyDelete